My current setup:
- Small townhouse in Brisbane.
- 3.9kW solar array (ugh small roof).
- Sungrow SH5.0RS inverter.
- Sungrow SBR096 home battery (9.6kWh).
- BYD Atto3 Premo.


AGL have a Night Saver EV Plan with very cheap electricity from midnight to 6am each day (at my location, only 8c/kWh). I mostly charge the car in that time period.
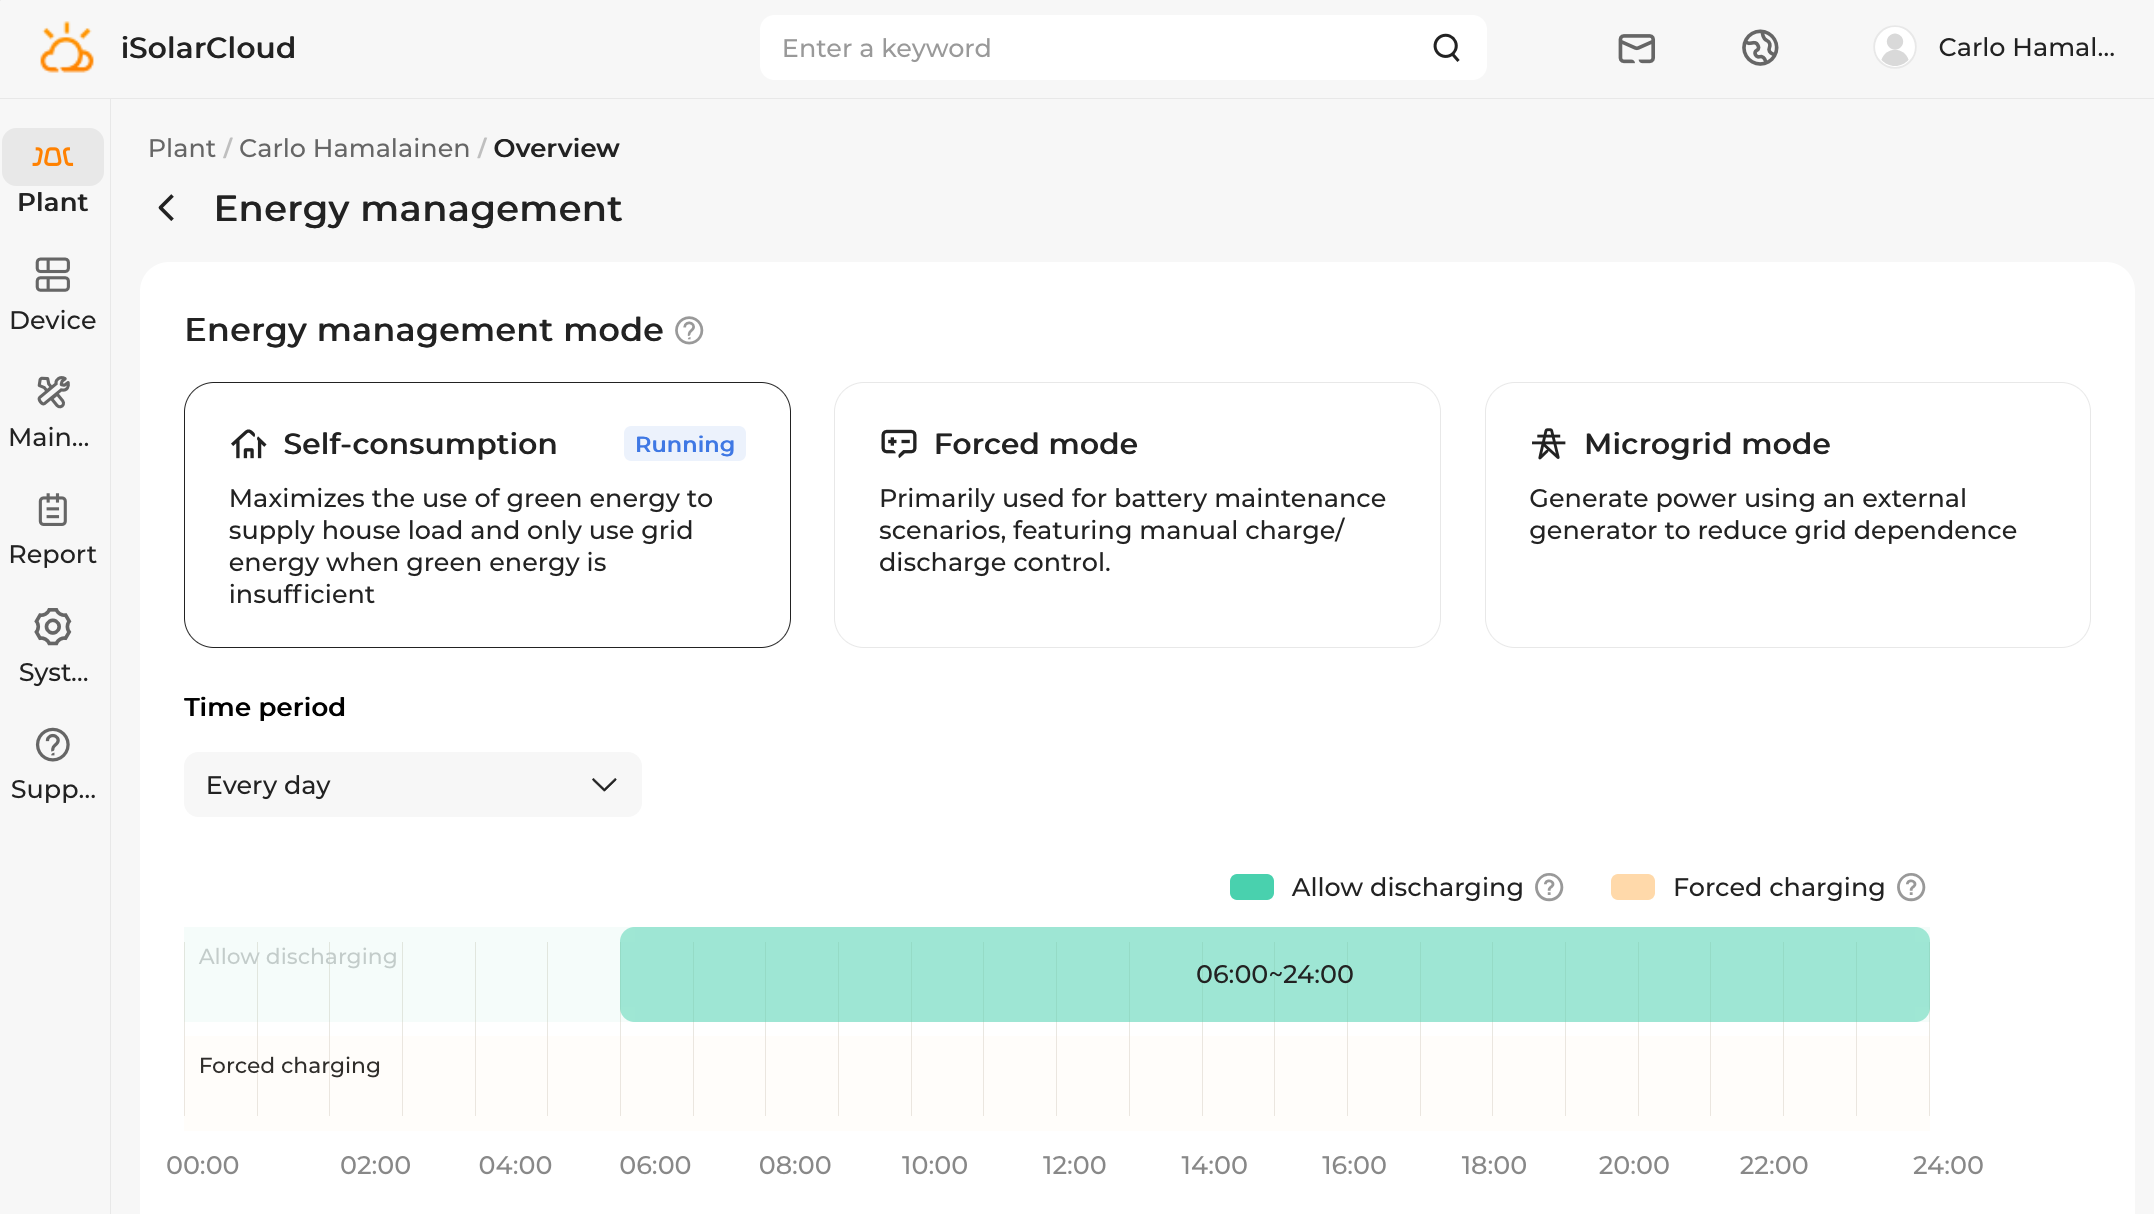
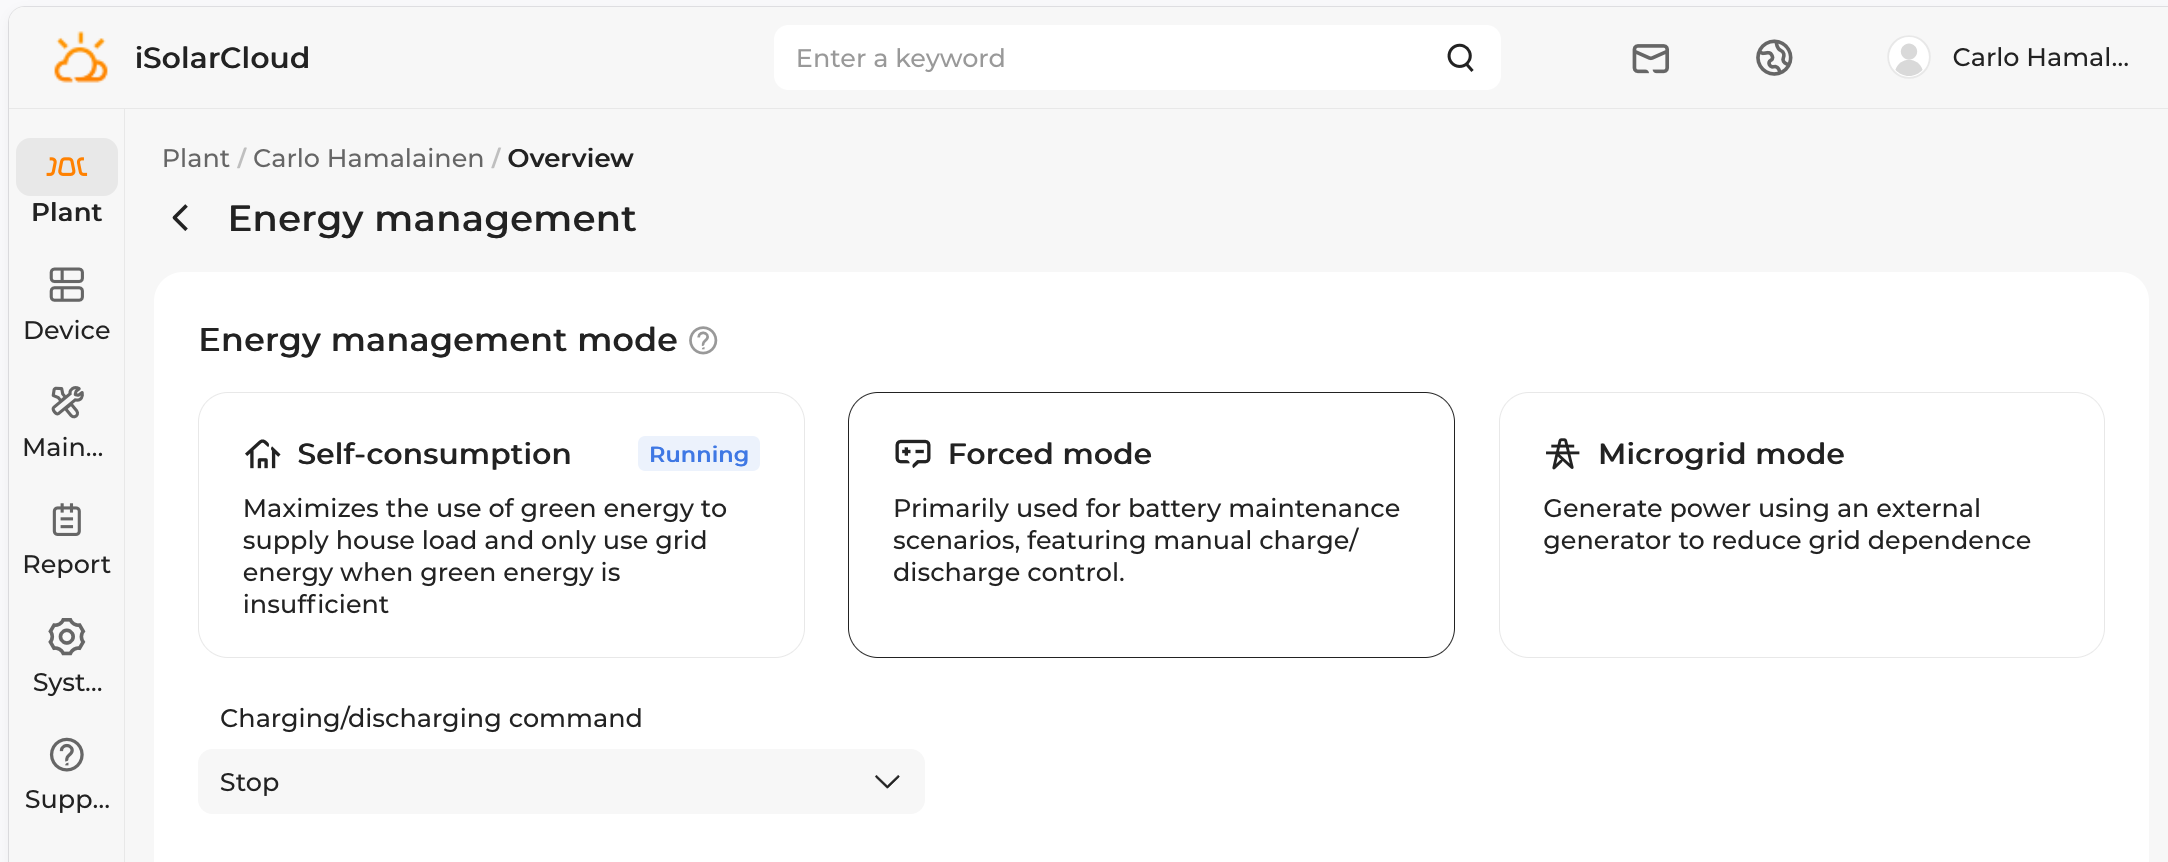
Sungrow provide the iSolarCloud app/site that provides control of the battery.
In self-consumption mode the battery will try to help reduce grid usage where possible, and charge from solar if there’s excess. Most of the time this is great. But the “forced charging” mode is quite restrictive, as it will charge the battery at its maximum rate to the target SOC. There’s no way to do adaptive charging based on the house load or other factors.
The interplay between the car and house battery charging isn’t the best, and the iSolarCloud app leaves some things to be desired.
In no particular order:
- I would like to “stop” the battery, either indefinitely or with an expiry time like 11:00pm.
- I would like to charge the battery in a particular time period, at a capped kW rate.
- I would like to charge the battery in a particular time period, at a capped amperage from the grid, being mindful of other household load (solar is a bonus).
- I would like to collect solar forecasts for my location and use this data to drive decisions, ideally automatically.
- I would like a simpler and more responsive control UI.
Clearly the solution is to write our own management software 🙂
Modbus and inverter registers Link to heading
Fortunately for us, Sungrow gives the option of opening port 502 so that we can communicate directly with the inverter using software like grid-x/modbus.
Connecting is straightforward, just create a new handler and then a client:
h := modbus.NewTCPClientHandler("192.168.1.42:502")
h.SetSlave(1) // magic number for Sungrow

if err := h.Connect(ctx); err != nil {
    return err
}
defer h.Close()

client := modbus.NewClient(h)
There are lots of registers we can read, so we lean on the work of our HomeAssistant modbus Sungrow friends who provide us with register definitions like this, gleaned from the Sungrow datasheet:
  # NOTE: In datasheet (1.1.11) it is recommended to use this register instead of 13022
  # negative: Battery charging
  # positive: Battery discharging
  - name: Battery power
    unique_id: sg_battery_power
    device_address: !secret sungrow_modbus_device_address
    address: 5213 # reg 5214-5215
    input_type: input
    data_type: int32
    swap: word
    precision: 0
    unit_of_measurement: W
    device_class: power
    state_class: measurement
    scale: 1
    scan_interval: *scan_interval_fast
This tells us that at offset 5213 we will find a signed 32bit integer for the battery power, where positive means the battery is discharging, and negative means the battery is charging.
So we read two 16bit words and hopefully recall our binary arithmetic:
bytes, err := client.ReadInputRegisters(ctx, 5213, 2)

lo := binary.BigEndian.Uint16(bytes[0:2])
hi := binary.BigEndian.Uint16(bytes[2:4])

batteryWatts := int(int32(uint32(lo) | uint32(hi)<<16))
Those “input” registers are read-only. In contrast, we can write to the three control registers 13049, 13050, 13051, giving us full control of the battery behaviour. Here are some handy constants:
const (
	RegEMSMode uint16 = 13049
	RegCommand uint16 = 13050
	RegForcedPower uint16 = 13051

	EMSSelfConsumption = 0
	EMSForced          = 2

	CmdCharge    = 0xAA
	CmdDischarge = 0xBB
	CmdStop      = 0xCC
)

type ControlRegisters struct {
	EMSMode     uint16 // EMSSelfConsumption, EMSForced
	EMSCommand  uint16 // CmdCharge, CmdDischarge, CmdStop
	ForcedPower uint16 // Watts
}
The EMS mode is about the overall mode like in the iSolarCloud UI (self-managed vs forced). When in forced mode we are able to specify maximum power for the force-charge and force-discharge commands. The power is ignored for the stop command.
With our ControlRegisters struct, the standard self-consumption mode is
ControlRegisters{EMSMode: EMSSelfConsumption}
Forcing the battery to charge at 1100W:
ControlRegisters{EMSMode: EMSForced, EMSCommand: CmdCharge, ForcedPower: 1100}
Forcing the battery to discharge at 1200W:
ControlRegisters{EMSMode: EMSForced, EMSCommand: CmdDischarge, ForcedPower: 1200}
And stopping the battery (it will sit idle, no charge or discharge):
ControlRegisters{EMSMode: EMSForced, EMSCommand: CmdStop}
We can write the three control registers in one go:
// The SH5.0RS quantizes the forced-power register to 10 W steps!
value.ForcedPower = (value.ForcedPower / 10) * 10

b := make([]byte, 0, 6)
b = binary.BigEndian.AppendUint16(b, value.EMSMode)
b = binary.BigEndian.AppendUint16(b, value.EMSCommand)
b = binary.BigEndian.AppendUint16(b, value.ForcedPower)

_, errWrite := client.WriteMultipleRegisters(ctx, RegEMSMode, 3, b)
This is the core of the read/write actions that we perform on the inverter. In practice we have
to chunk the “input” registers into contiguous blocks so that we can perform fewer
client.ReadInputRegisters() calls, but this is some simple bookkeeping.
We have a Server struct with all of the run time state. We launch the Run
function in a single goroutine, thus serialising all inverter access.
func (s *Server) Run(ctx context.Context, interval time.Duration) {
	ticker := time.NewTicker(interval)
	defer ticker.Stop()

	st := &workerState{}

	s.handle(ctx, st)

	for {
		select {

		// Context cancelled, we should leave.
		case <-ctx.Done():
			return

		// Regular tick event.
		case <-ticker.C:
			s.handle(ctx, st)

		// User did something and tried to wake us up.
		case <-s.wake:
			s.handle(ctx, st)
		}
	}
}
The wake channel is buffered with size 1, and a http handler can wake the Run loop in a non-blocking manner
since default in a select is a catch-all case:
func (s *Server) signalWake() {
	select {
	case s.wake <- struct{}{}:
        // wake was empty; we're done
	default:
        // wake was full; nothing for us to do
        // as someone else has already called signalWake()
	}
}
In practice there’s a bit more run time state - we maintain a cache of all the sensor and control registers so that
http handlers and the Prometheus metrics endpoint can read values protected by a single sync.Mutex. The mutex is held for
short periods of time, usually with a Lock() and defer Unlock():
func (s *Server) SnapshotSensors() map[string]sungrow.Sensor {
	s.hardwareCache.mu.Lock()
	defer s.hardwareCache.mu.Unlock()

	out := make(map[string]sungrow.Sensor, len(s.hardwareCache.sensors))
	for _, sensor := range s.hardwareCache.sensors {
		out[sensor.UniqueID] = sensor
	}
	return out
}
Adaptive charging Link to heading
Now that we have access to the inverter state and control registers, we can implement an adaptive charging algorithm: charge the battery until it reaches an SOC goal, but cap the total grid import, and give priority to other load in the house like the oven, kettle boiling, EV charging. At night time, simultaneously charging the EV and battery goes through a single 20A RCD (I will get this upgraded eventually) so we can create a schedule in terms of maximum amperage. Recalling high school physics:
\[ P = V \times I \]so a cap of 18A at 240V translates to
$$P = 240 \times 18 = 4320W.$$The algorithm should be conservative, only ramping up in 500W increments; if the desired charge is below 200W then it should stop, and to reduce flip-flopping it should quantize into 100W increments.
In pseudo-code:
RAMP_UP   = 500 W per tick     # slow climb: ~40s from 0 to 4 kW
MIN_RATE  = 200 W              # below this, hold at force-stop
QUANTUM   = 100 W              # command granularity / noise deadband

BATTERY_MAX_CHARGE_POWER = 5800 # as per battery specs

ceiling = 4320 # 18A @ 240V

setpoint = 0.0

every tick:
  if not in charge window or target SOC reached or a manual override is active:
      setpoint = 0 # next entry soft-starts from zero
      apply the appropriate non-adaptive command
      return

  importW = current grid import in watts
  batteryW = current battery charging power in watts

  other_load = importW - batteryW    # what the rest of the house is drawing
  target     = ceiling - other_load  # headroom left for charging

  if target < setpoint:
      # drop IMMEDIATELY (kettle just turned on)
      setpoint = target
  else:
      # climb slowly
      setpoint = min(setpoint + RAMP_UP, target)

  setpoint = clamp(setpoint, 0, BATTERY_MAX_CHARGE_POWER)

  command = QUANTUM * floor(setpoint / QUANTUM)

  if command < MIN_RATE:
      apply force-stop # no headroom, we're done
  else:
      send forced-charge at command watts
An example of overnight adaptive battery charging:
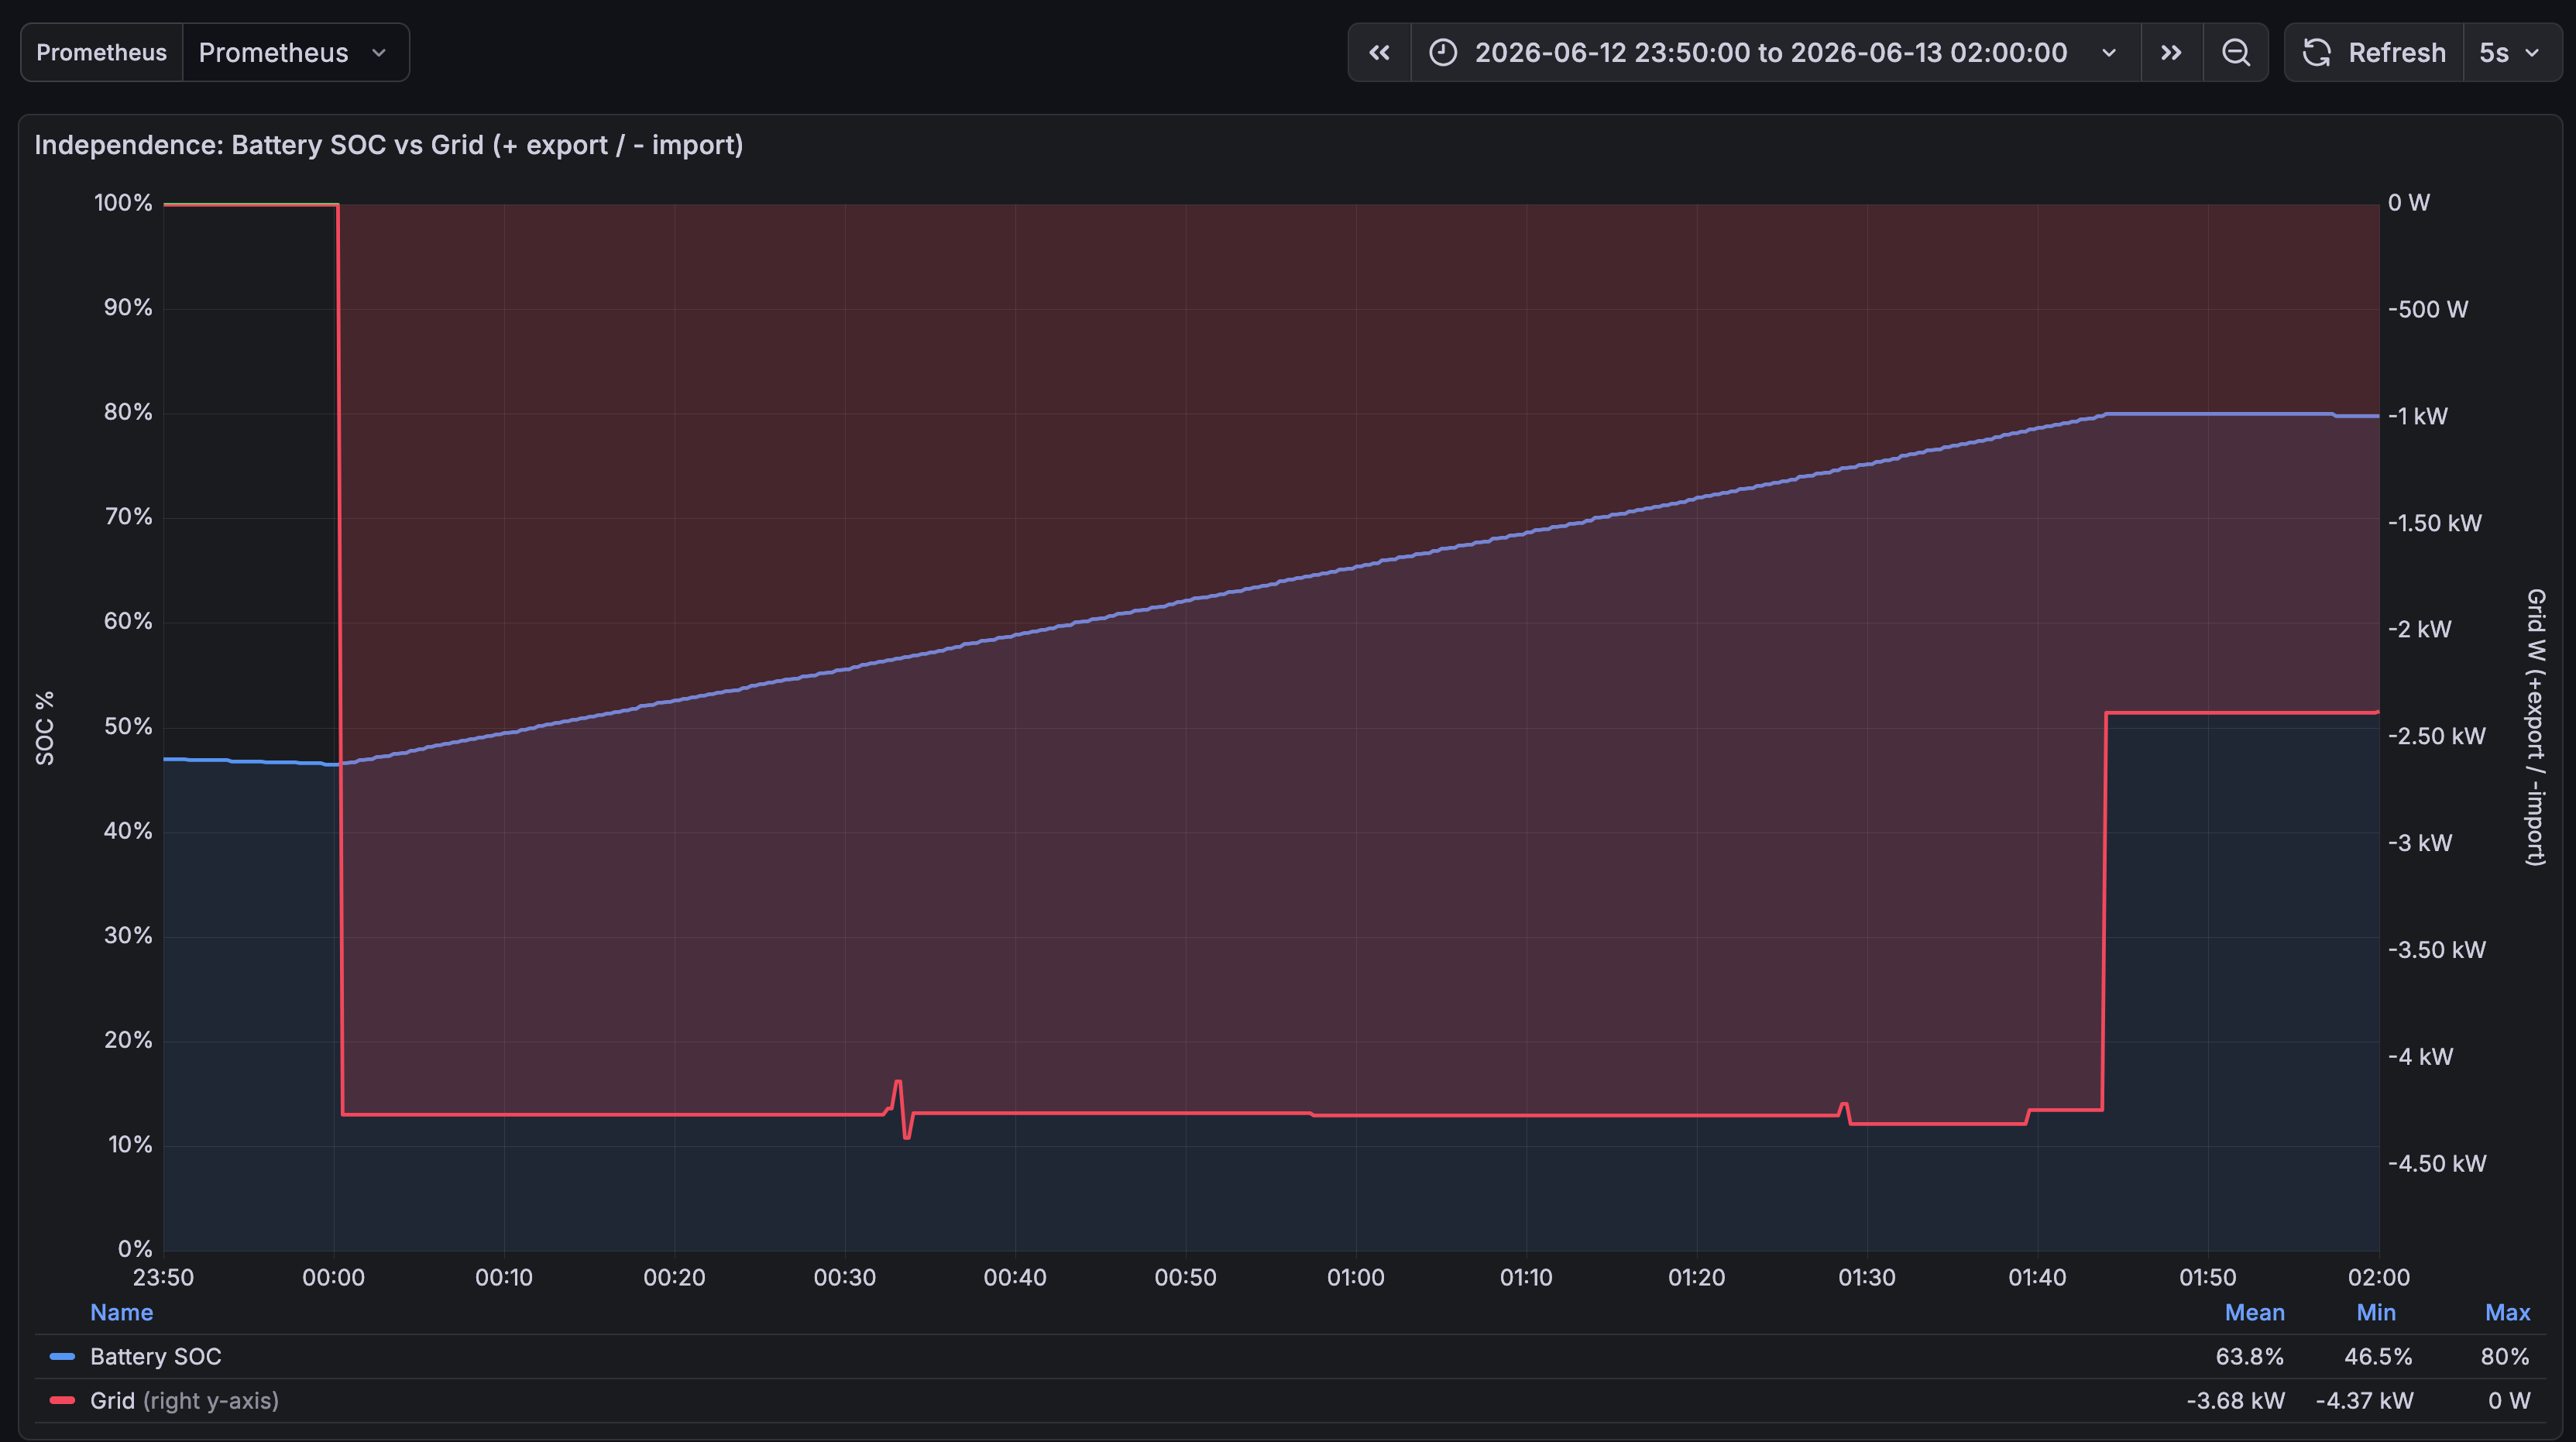
There are a few wiggles, like at 00:30 where it changed from 1.7kW, to 1.8kW, to 1.9kW, and back to 1.8kW. It’s good enough for me.
| Time | Write | Result |
|---|---|---|
| 13 Jun 06:00:06 | stop → self consumption | ok |
| 13 Jun 01:43:46 | charge 1.80 kW → stop | ok |
| 13 Jun 01:39:16 | charge 1.90 kW → charge 1.80 kW | ok |
| 13 Jun 01:28:26 | charge 1.80 kW → charge 1.90 kW | ok |
| 13 Jun 00:33:36 | charge 1.90 kW → charge 1.80 kW | ok |
| 13 Jun 00:33:31 | charge 1.80 kW → charge 1.90 kW | ok |
| 13 Jun 00:33:26 | charge 1.90 kW → charge 1.80 kW | ok |
| 13 Jun 00:33:01 | charge 1.80 kW → charge 1.90 kW | ok |
| 13 Jun 00:32:56 | charge 1.70 kW → charge 1.80 kW | ok |
| 13 Jun 00:00:21 | charge 1.50 kW → charge 1.70 kW | ok |
| 13 Jun 00:00:16 | charge 1.00 kW → charge 1.50 kW | ok |
| 13 Jun 00:00:11 | charge 0.50 kW → charge 1.00 kW | ok |
| 13 Jun 00:00:06 | self consumption → charge 0.50 kW | ok |
The UI Link to heading
The UI is a single html page with front-end interactivity driven by Datastar.
We have solar forecasts and recent observed values (the forecasts are way off, I need to calibrate these).
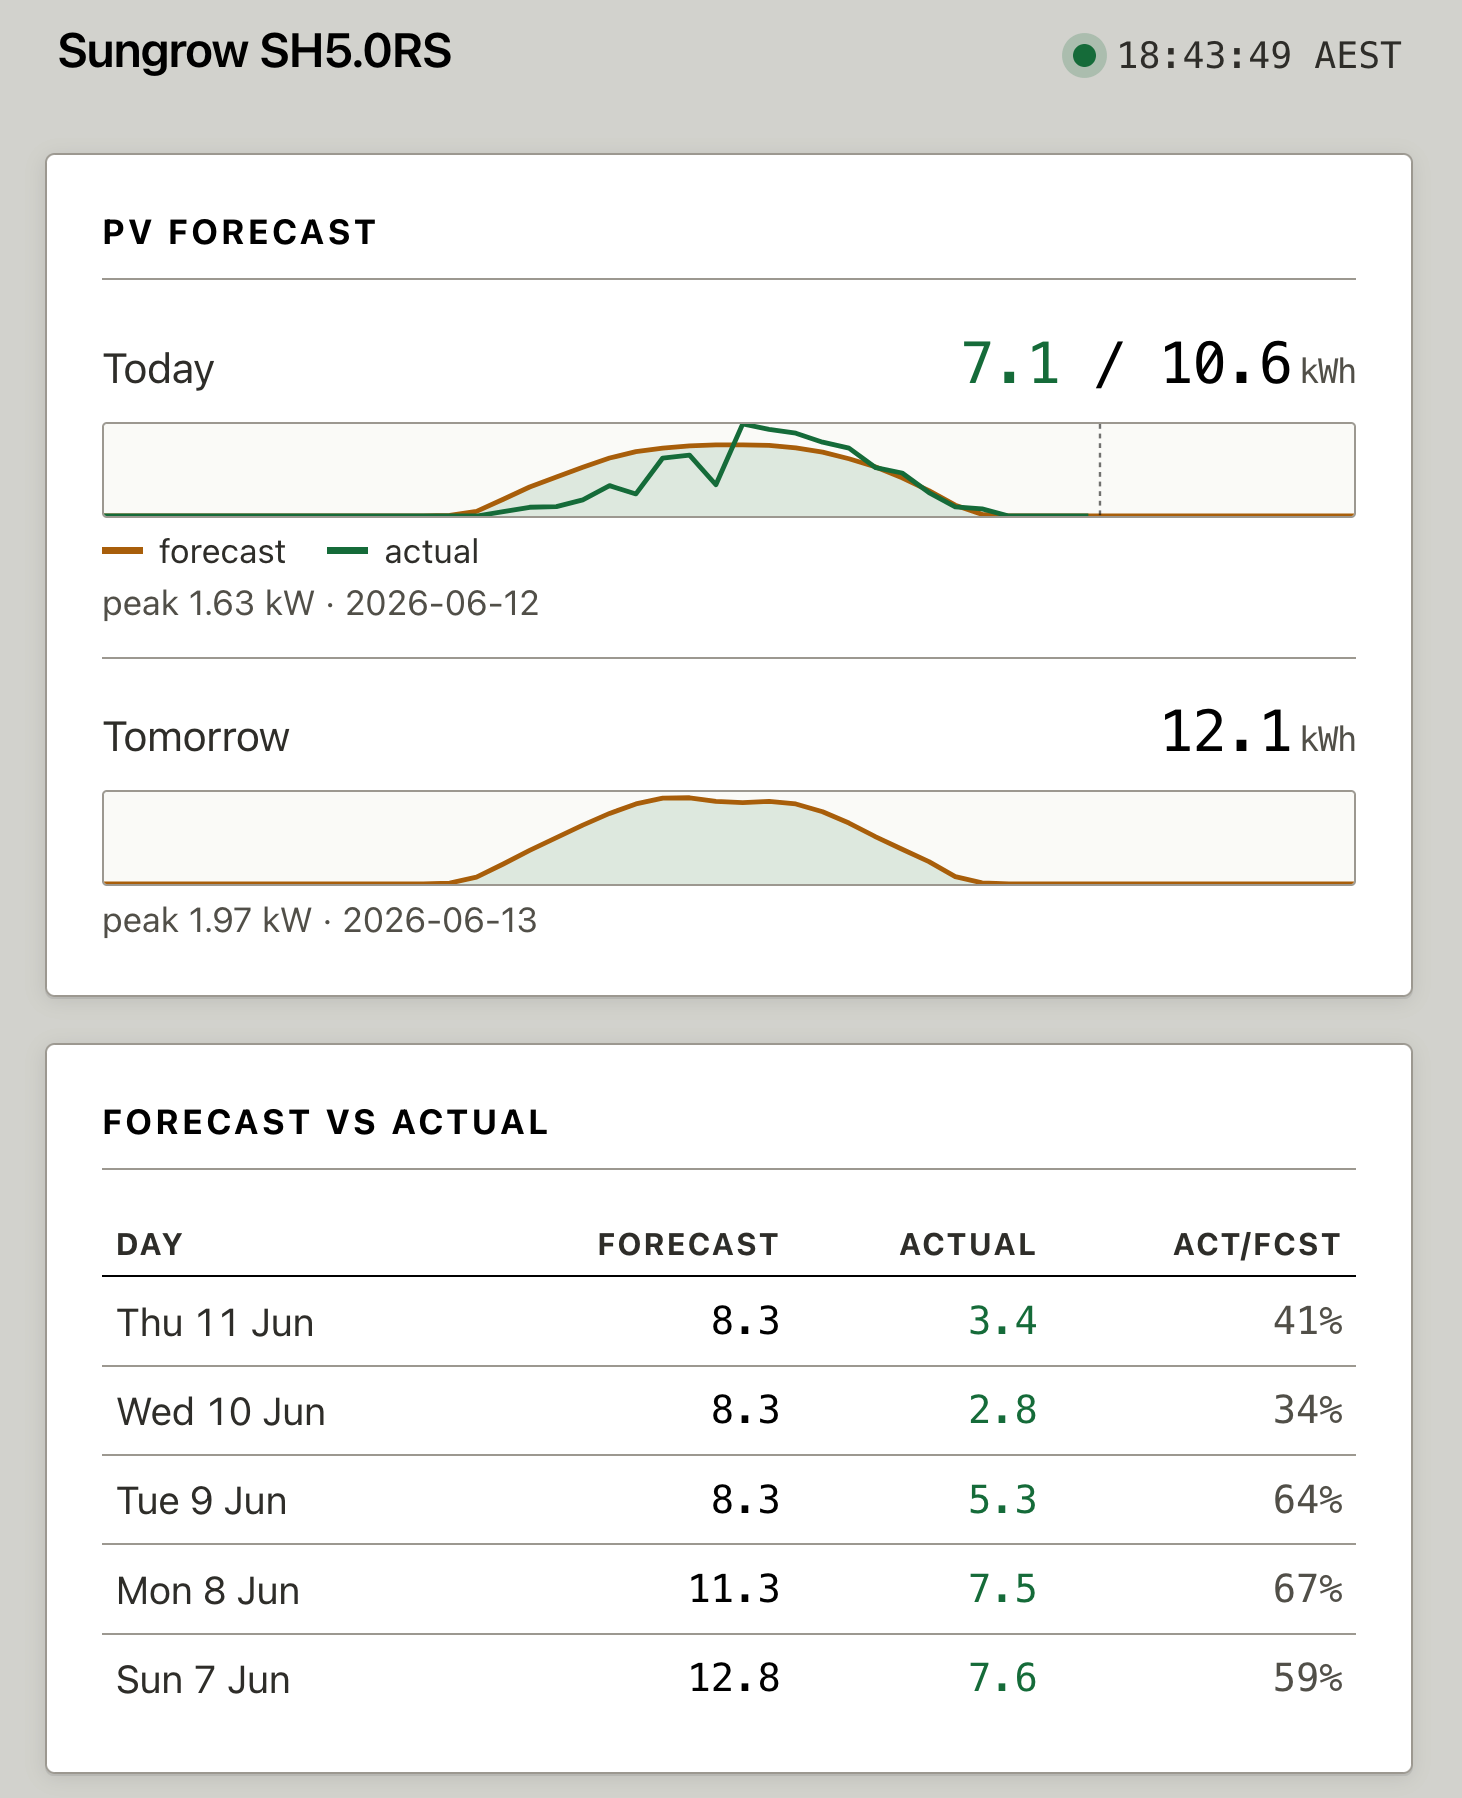
The live energy flow of each part of the system is on the next card, battery state of charge, and the control state.

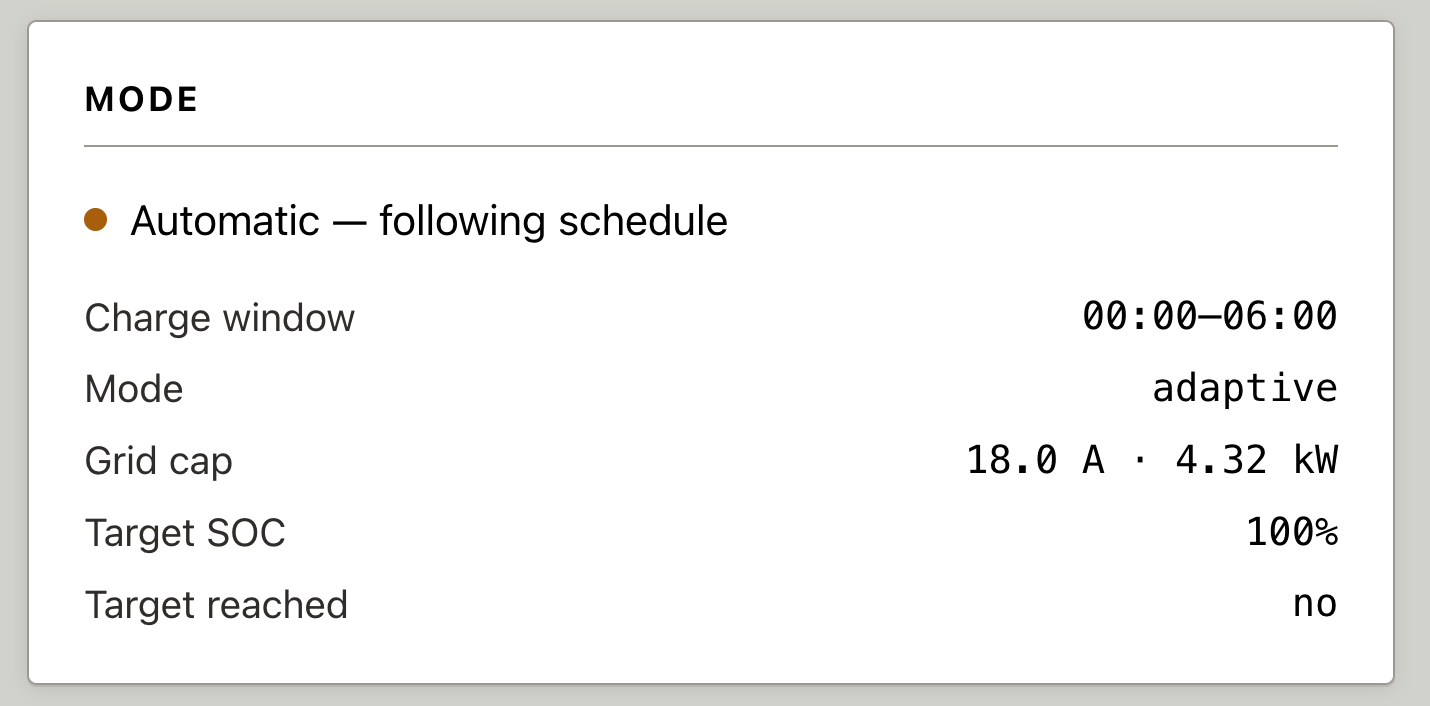
The mode card describes the schedule or manual override that is in place.
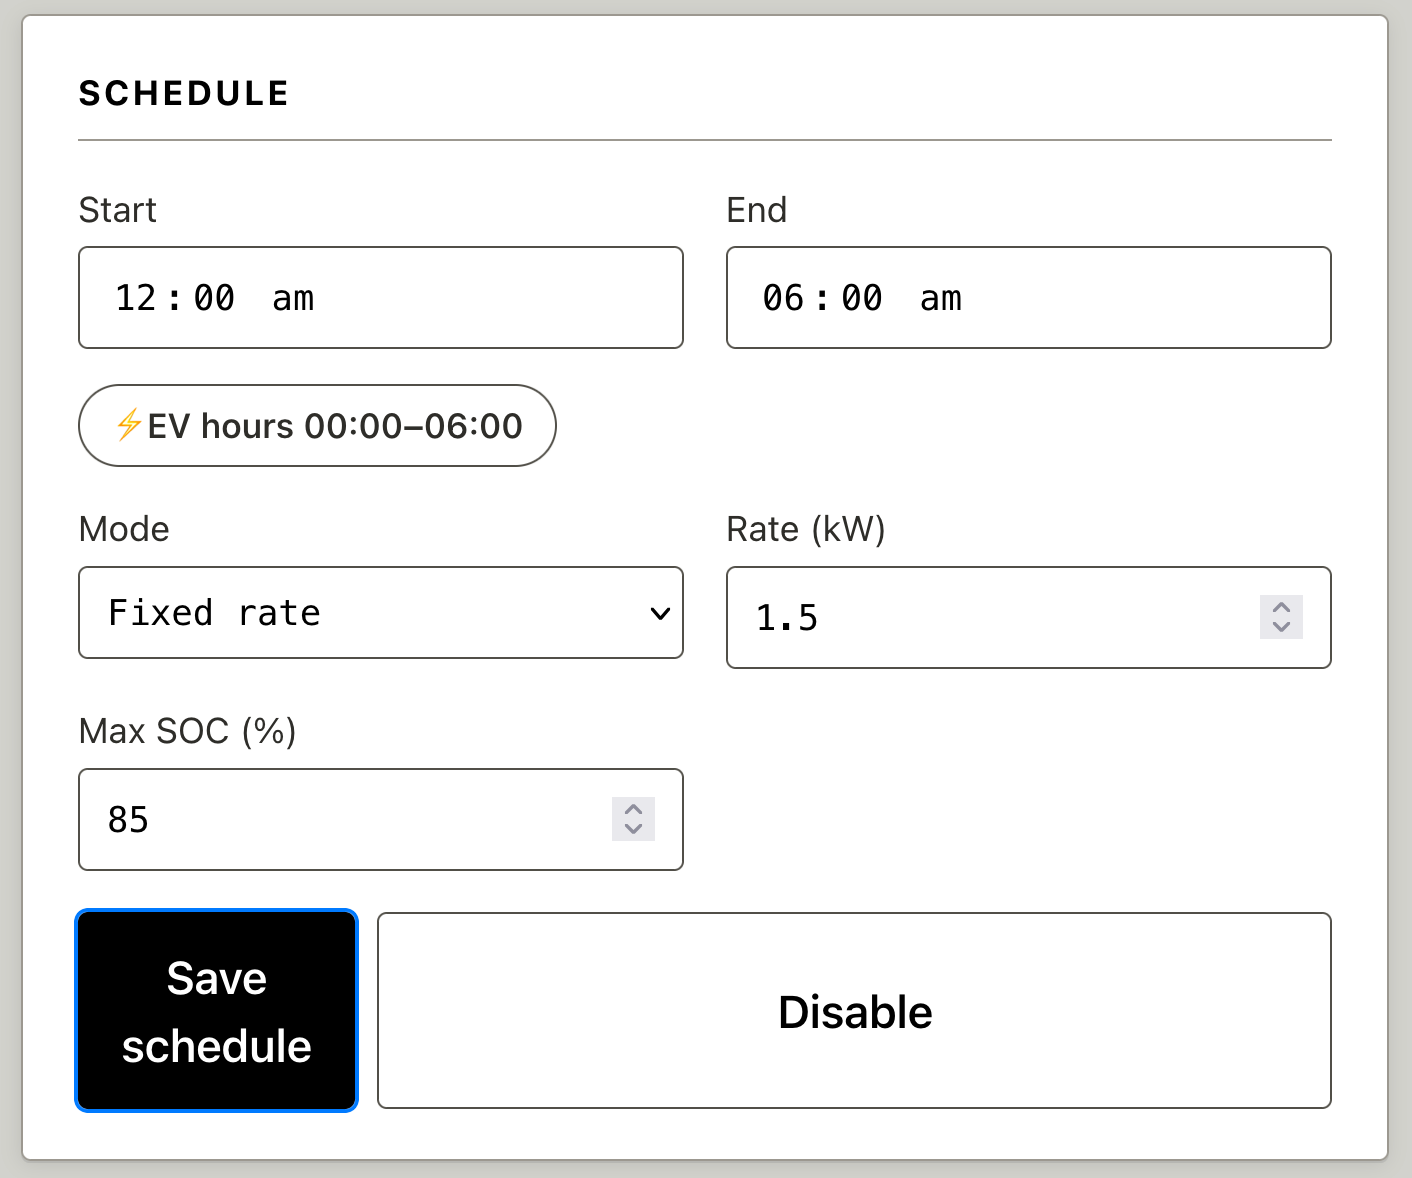
The schedule card lets us edit a fixed rate schedule:
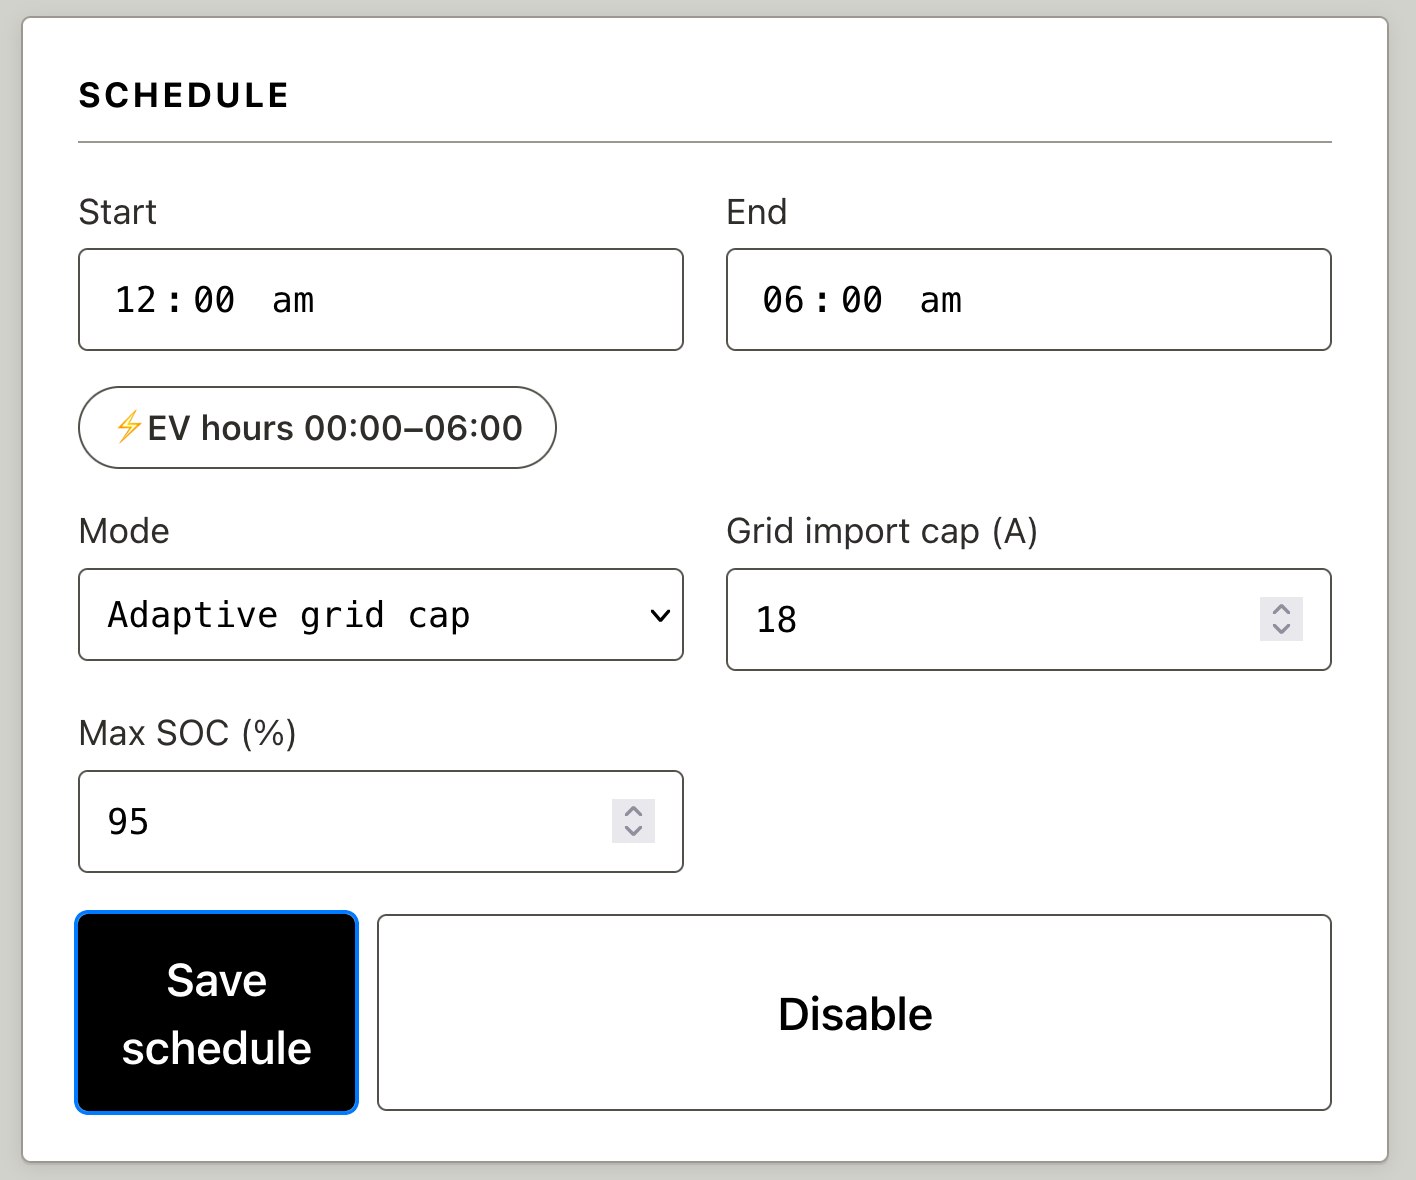
And also adaptive schedules based on maximum amps:
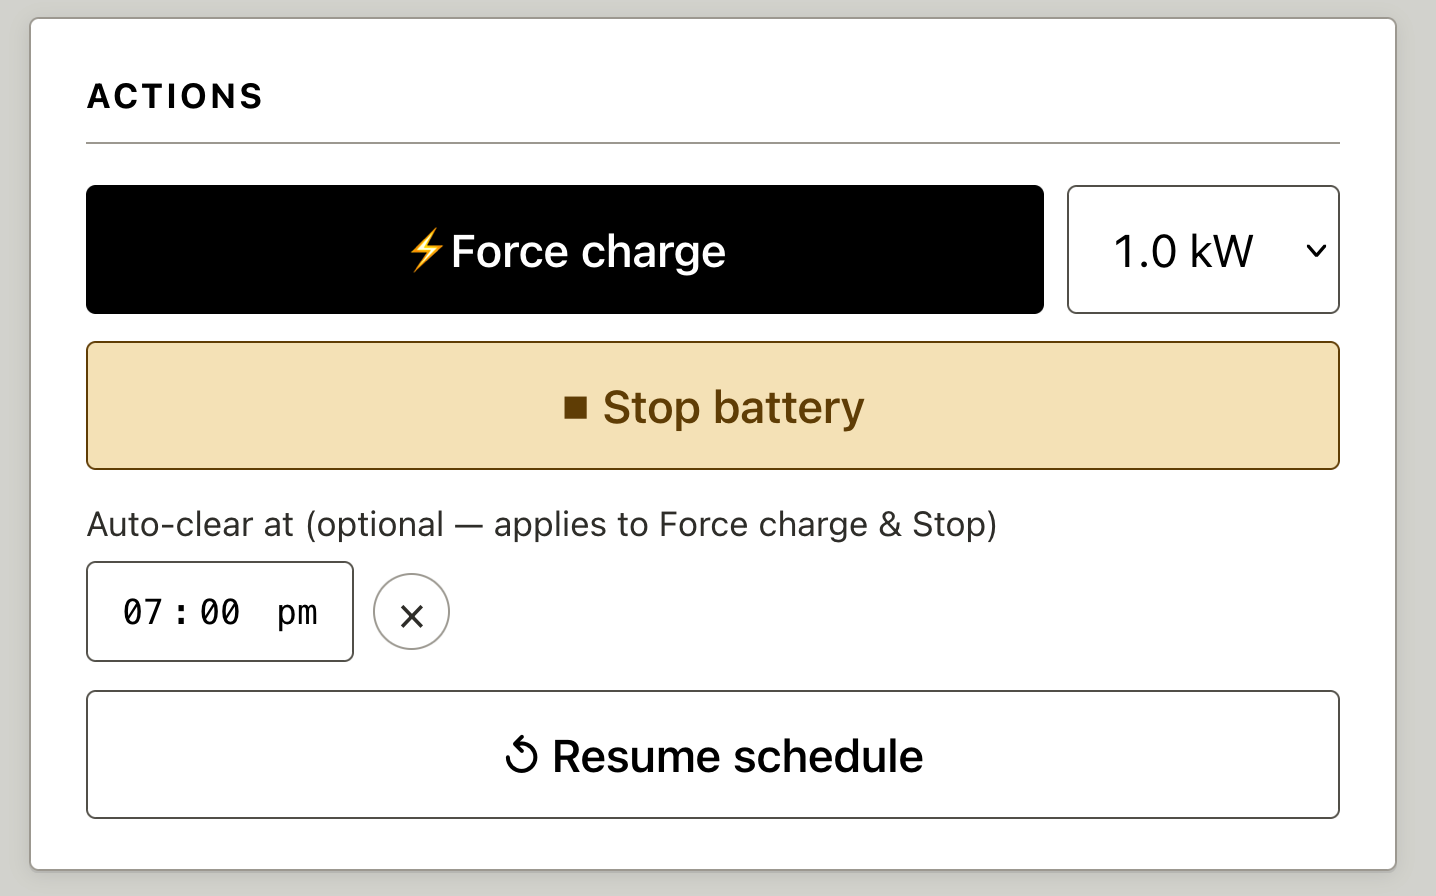
We can force charge or discharge, with optional expiry:
Every action is logged in an audit table in SQLite. Modbus seems touchy about multiple clients reading/writing simultaneously; the error line
failed to read control registers after: modbus: exception '4' (server device failure), function '3'
was due to me testing with two copies of the system running. Oops!

Prometheus scrapes the /metrics endpoint every 30 seconds so we can make cool dashboards.
Power flow and major statistics:

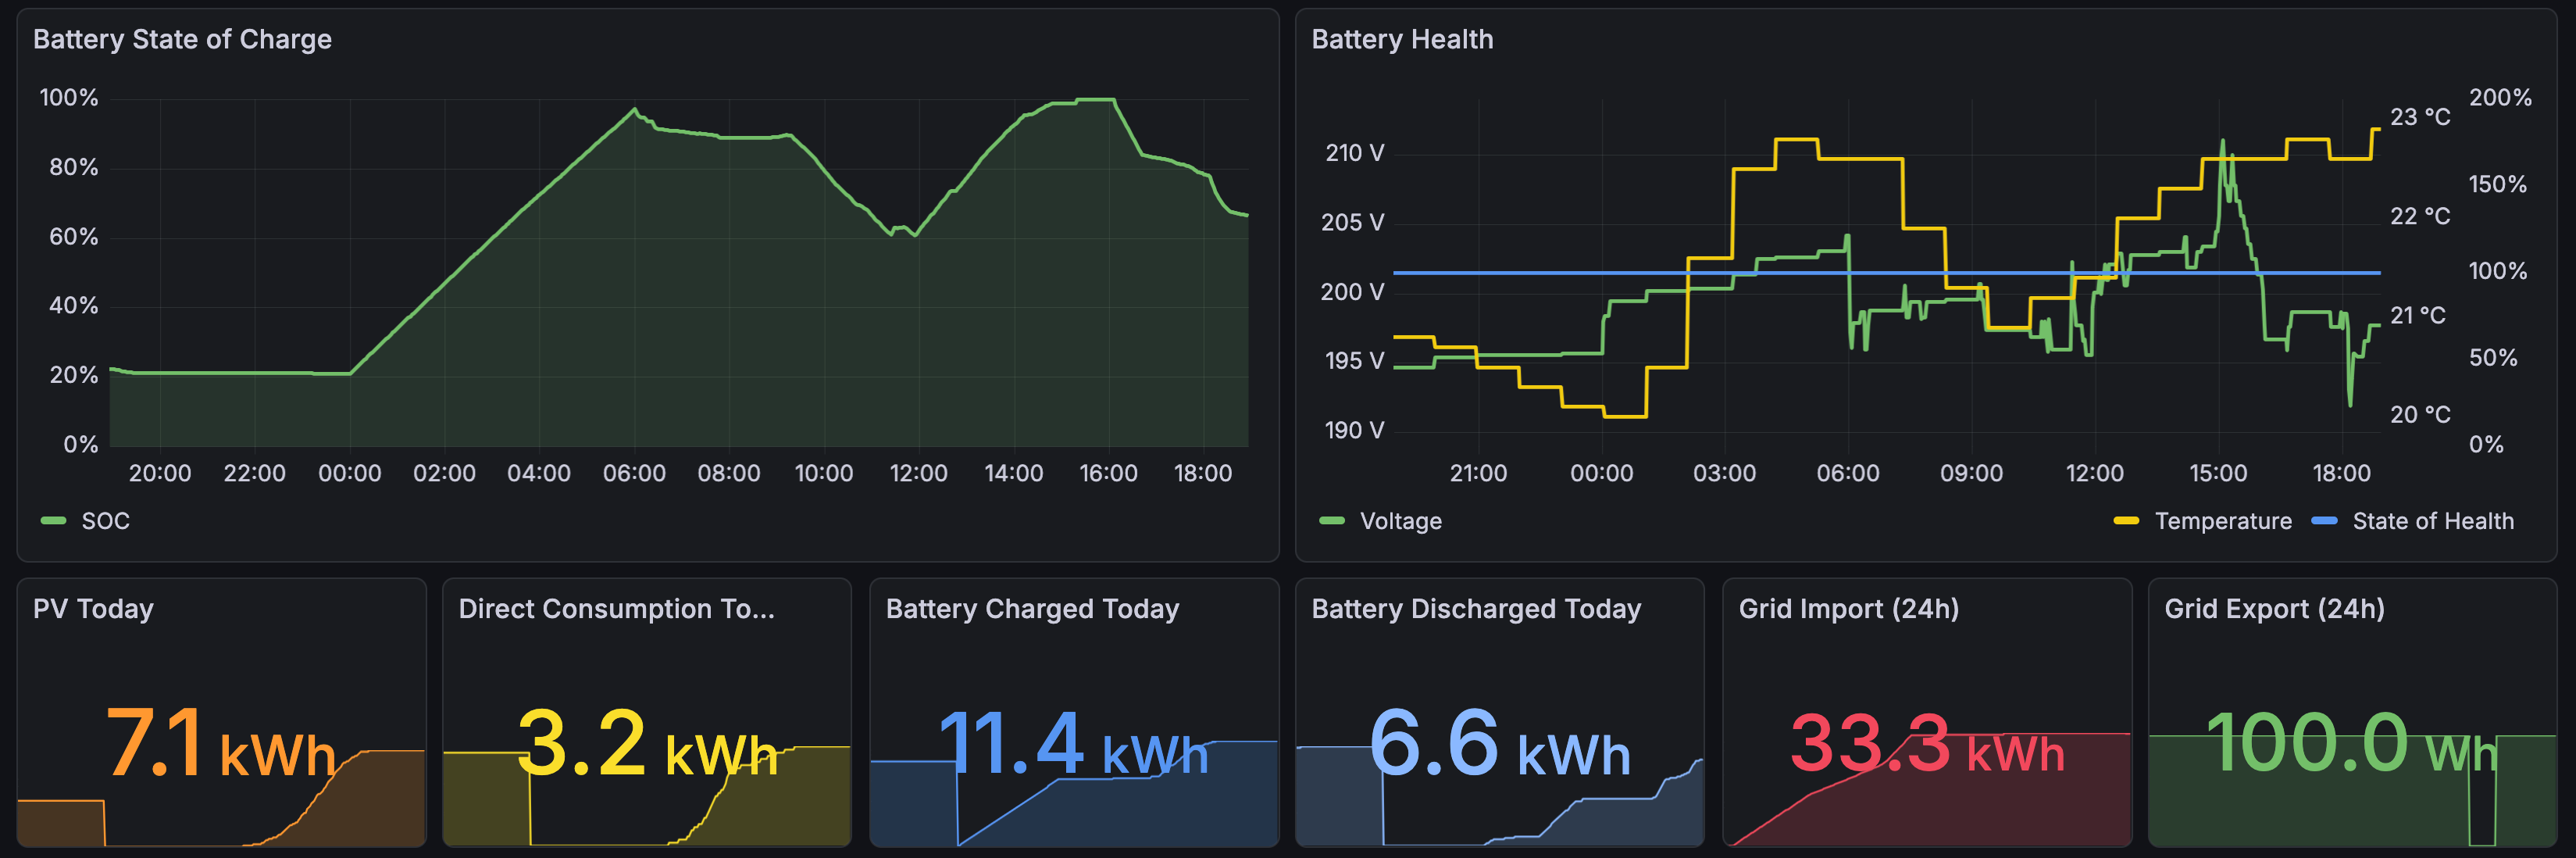
Battery state, health, and more statistics:
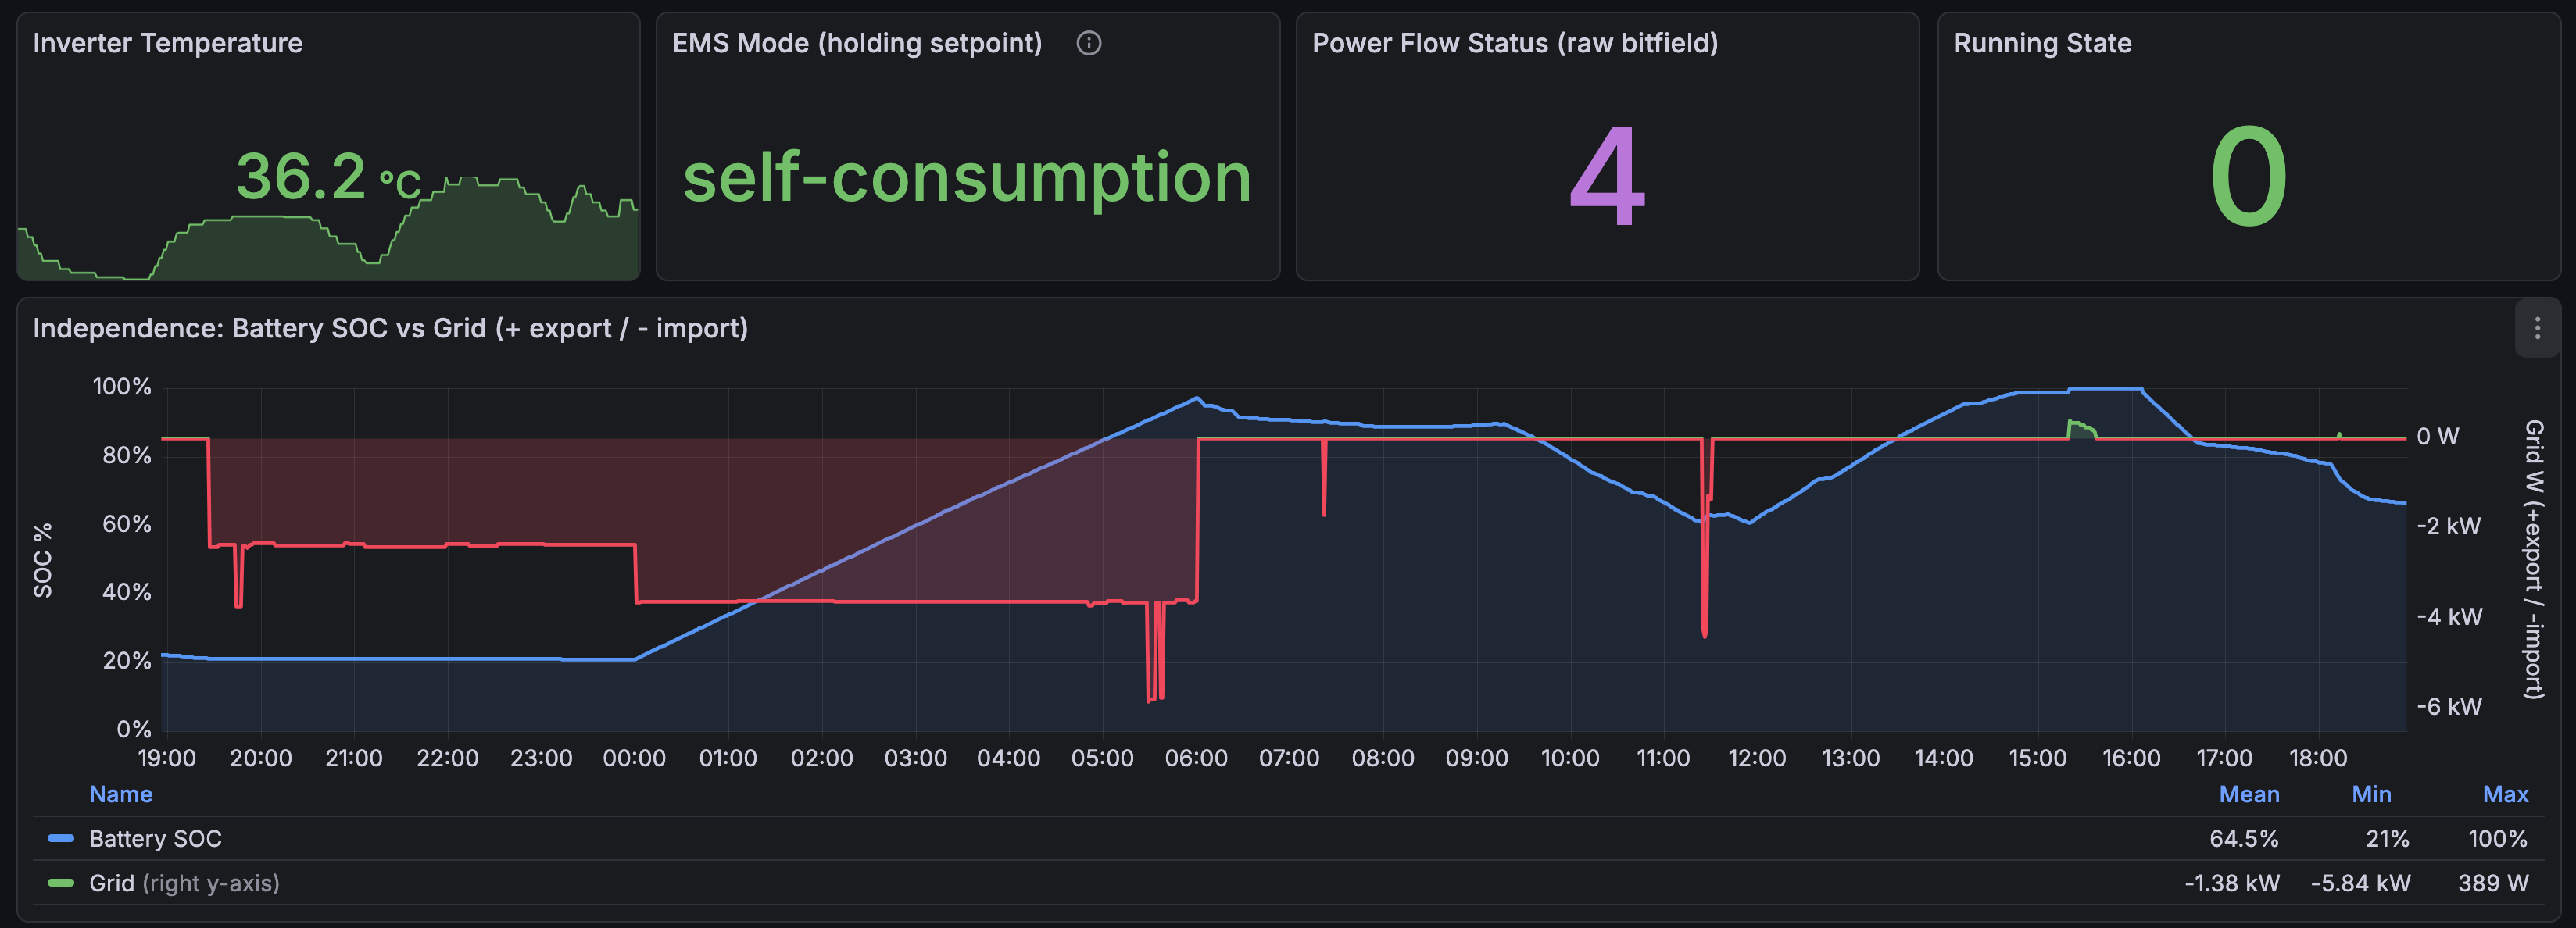
Management mode and my “grid independence” plot:
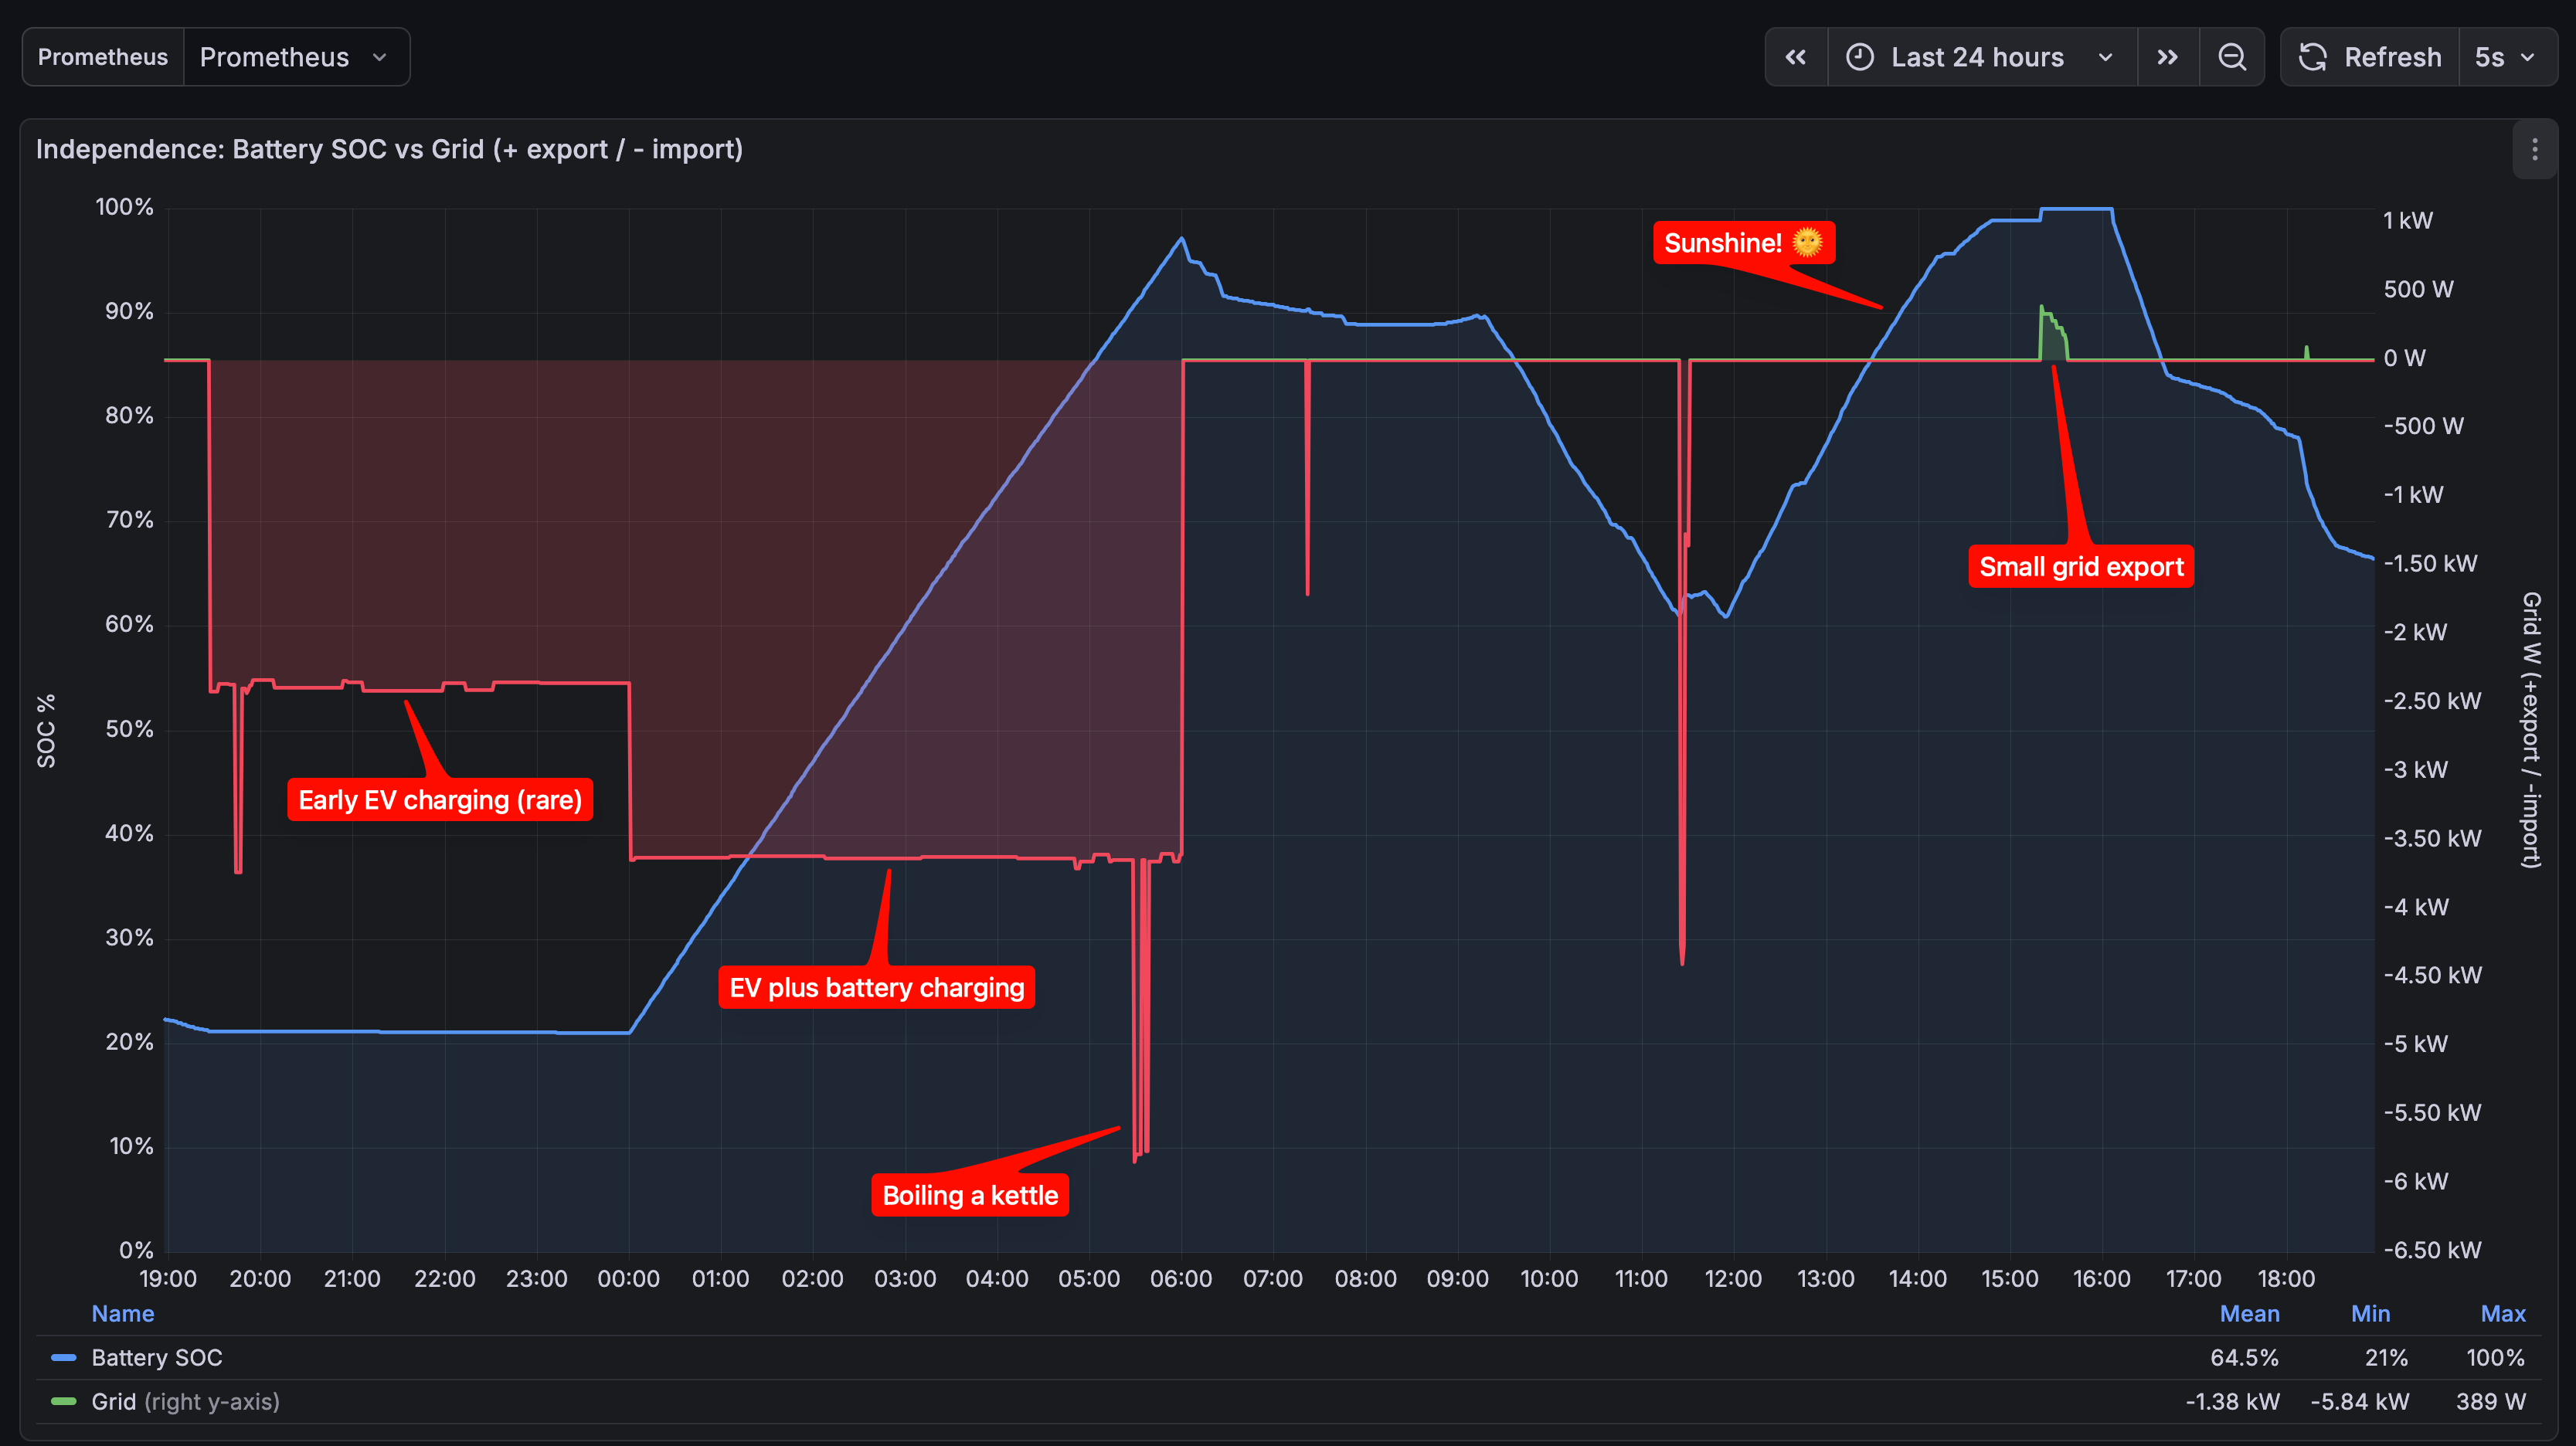
Annotated independence plot: this is where I keep an eye on accidental grid export, overnight charging, and battery state.
The moving parts: Go, SQLite, Datastar, Solcast, Prometheus, Grafana, Ansible Link to heading
What started off as “Go and Datastar” turned into quite a bit more. Some of these components (like Prometheus and Grafana) are shared with other services on my small homelab Debian Linux server.
| Component | What it’s for |
|---|---|
| SQLite | Persistent storage: schedules, manual overrides, solar forecasts, and the audit log of every action. Handing over synchronisation and transactions to SQLite is a no-brainer these days. |
| modernc.org/sqlite | Pure-Go SQLite driver — no CGO, so cross-compiling for the fanless homelab server is painless. |
| Datastar | Front-end interactivity: SSE-driven page updates and declarative bindings, no custom JavaScript. |
| Solcast | Rooftop solar forecasts for my location, used to drive charging decisions. |
| Prometheus | Scrapes the /metrics endpoint every 30 seconds to store time series of all the sensor values. |
| Grafana | Dashboards over the Prometheus data: power flow, battery health, grid independence. |
| Ansible | Deployments: building the binary and pushing it to the server, plus config for the supporting services. We just have to deploy a single statically compiled binary (thanks Go!). |
Datastar Link to heading
Like most Datastar applications, we use data-init to run a GET request
to the ui/updates URL, which starts the long-running SSE stream.
The sections of the page that we want to patch have unique IDs, e.g. forecast, compare, and so on.
<body data-init="@get('/ui/updates')">
  <div class="wrap">

    <section class="card">
      <h2>PV forecast</h2>
      <div id="forecast"><p class="empty">loading…</p></div>
    </section>

    <section class="card">
      <h2>Forecast vs actual</h2>
      <div id="compare"><p class="empty">loading…</p></div>
    </section>

    <!-- more like this -->

  </div>
</body>
The schedule editor is the most complicated part of the UI. We use data-bind to
create the two-way data binding between the input fields.
The helper button ⚡EV hours 00:00–06:00 uses data-on:click
to update the $scheduleStart and $scheduleEnd signals with handy presets.
The Save schedule button has a few things going on:
<button class="btn-primary"
      data-on:click="@post('/ui/action/schedule')"
      data-indicator="savingSched"
      data-attr:disabled="$savingSched">Save schedule</button>
- data-on:click launches a
POSTrequest to/ui/action/schedule. - data-indicator is used to disable the button while the
POSTis in flight. - data-attr:disabled disables the button while the
POSTis in flight, i.e.$savingSchedistrue.
The backend sends success/failure information to the div below, called schedule-result:
<div id="schedule-result"></div>
Here’s the schedule div in full:
    <section class="card">
      <h2>Schedule</h2>
      <div class="sched">
        <label>Start
          <input type="time" data-bind:schedule-start>
        </label>
        <label>End
          <input type="time" data-bind:schedule-end>
        </label>
        <button type="button" class="btn-preset"
                data-on:click="$scheduleStart='00:00';$scheduleEnd='06:00'">⚡EV hours 00:00–06:00</button>
        <label>Mode
          <select data-bind:schedule-mode>
            <option value="fixed">Fixed rate</option>
            <option value="adaptive">Adaptive grid cap</option>
          </select>
        </label>
        <label data-show="$scheduleMode !== 'adaptive'">Rate (kW)
          <input type="number" min="0.1" max="{{.MaxKW}}" step="0.1" data-bind:schedule-kw>
        </label>
        <label data-show="$scheduleMode === 'adaptive'">Grid import cap (A)
          <input type="number" min="1" max="{{.FuseA}}" step="0.5" data-bind:schedule-cap-a>
        </label>
        <label>Max SOC (%)
          <input type="number" min="1" max="100" step="1" data-bind:schedule-soc>
        </label>
        <div class="row">
          <button class="btn-primary"
                  data-on:click="@post('/ui/action/schedule')"
                  data-indicator="savingSched"
                  data-attr:disabled="$savingSched">Save schedule</button>
          <button class="btn-ghost"
                  data-on:click="@post('/ui/action/schedule-disable')"
                  data-indicator="disablingSched"
                  data-attr:disabled="$disablingSched">Disable</button>
        </div>
      </div>
      <div id="schedule-result"></div>
    </section>
It’s so simple to get going with Datastar, just add a script to the html page and add some data- attributes.
<script type="module" src="https://cdn.jsdelivr.net/gh/starfederation/datastar@v1.0.2/bundles/datastar.js"></script>
It’s my go-to for any simple UI these days. I like it so much that I contributed the Haskell SDK.
The source Link to heading
https://codeberg.org/carlohamalainen/sungrowd-go
Comment form pending Cloudflare verification...
Loading comments…